Access Points (also referred as AP) are devices that are hooked to the main router (through wire or wirelessly) & solely work to either extend WiFi network or support more number of devices than a single router/access point can support.
APs are also called wireless or wired bridge in more technical terms. The wireless bridging is also termed range extender or range expander.
The main router that is connected to internet is also called internet gateway or simply gateway. Since this is the single point of entry for internet, all check points like firewall etc go in here. In a bigger setup, this device is usually replaced by a UTM (Unified Thread Management) device (also referred as hardware firewall).
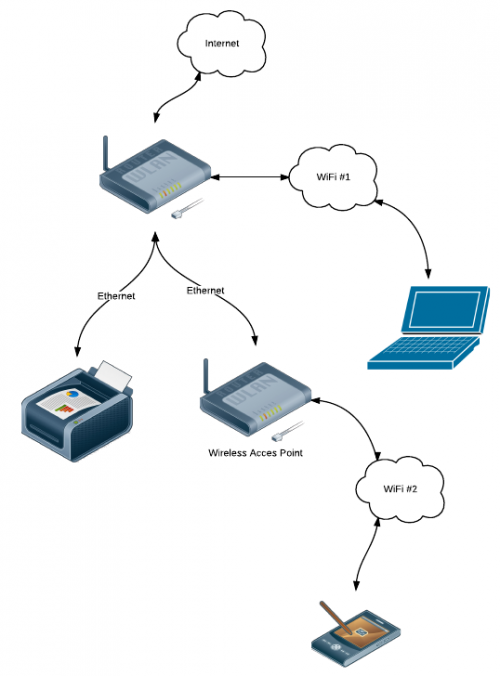
In the image above, the router marked ‘Wireless Access Point’ is the AP connected through ethernet cable to the router which in turn is getting internet from outside. Devices like laptop or mobile phones can either connect to the WiFi of the router or that of the AP.
If you have WiFi reach problem in your office/home, you could get started with setting up APs to extend WiFi & the process is reasonably straight forward if you have couple of spare home routers lying around. They can be convered to APs very easily.
If you are just starting with network/internet setup & need help figuring out which gateway, AP & other devices to buy, head over to A-Z network setup guide
Types of APs
1. Enterprise Grade
These are devices explicitly sold as Access Point. Ubiquiti UnFi series is one good range of AP that starts at around $100 . One AP is able to take around 100 devices.
These devices are also PoE devices which means power over ethernet. They derive power from the ethernet cable & dont need a separate power adapter.
While PoE devices are easy to setup as you dont need a power point next to the place you are setting up the AP, they seem to have low WiFi transmission power as compared to adapter powered devices. This might look like a bottleneck, specially if your setup has walls through which WiFi penetration is a problem, it is not. Transmission power of WiFi device should never be considered as a factor to consider the WiFi strength, as although the device is able to transmit on a high power, it still need to get data from the users devices, who keep continue to send data at their own level. So its the reception senstivity of an AP that you should look into if you are looking for a performance metric.
2. Router converted to AP
You could convert any (home) router to work as AP. The advantage of AP configuration is, you could wirelessly extend the WiFi network which you will not be in the default state.
Any cheap home router can be used as AP. If you are looking for something strong, go for something with multiple antenna as they will be able to support more user devices on the WiFi. TP Link 940N is a good bet in the range of $25 for this.
If you have a fairly dense wall setup, its best you put one cheap router converted to AP inside each room rather investing on fewer expensive multiple antenna router. Reason being, the walls are going to be the show stopper for you.
AP setup - wired vs wireless
The AP needs connection to main router through a ethernet wire or without it (wireless). The wired setup has a significant advantage of high speed.
1. No speed throttling between router & AP. In wireless bridge setup, the router & AP are coupled through WiFi. WiFi signal could be in 2.4 Ghz or 5 Ghz band. 2.4 Ghz band is long range band but practically support data transmission < 30 Mbps. 5 Ghz band could support data transmission upto 100 Mbps but the range of this band is too small. So if your router & AP are positioned more than 10 meter, this coupling will not work.
If you have internet connection of around 200 Mbps, the AP could still only talk to main router at 30 Mbps or 100 Mbps depending on which band is chosen for coupling.
2. Further speed reduction by half due to data duplication. The AP essentially acts as bridge between all connected clients & routers. Lets say if there are 2 devices connected to AP & both of them are doing something bandwidth intensive. Assuming the best speed the AP could get between itself & router is 30 Mbps (2.4 Ghz coupling), it will only be able to give 15 Mbps to both clients combined as the traffic from the clients need to be re-broadcasted to the router. So the effective bandwidth available to all the clients combined is further reduced by half.
The wireless setup has advantage that there is no issue of laying cable connecting the router to the AP. Although, you need to ensure that an AP has WiFi reach from at least another AP which in-turn has access to the router (directly or through another AP). Else, you might have a set of APs that might be able to interact with each other but not able to send/receive traffic from the router.
Wired AP setup (wired bridge)
In the setup where each AP is directly/indirectly connected to the main router through ethernet cable, you could set different SSID & password on each AP. This approach has both its pros & cons. It looks more professional to have one single WiFi across your whole setup. But if you have different SSIDs, it is easy to pin point to an AP if any problem occurs.
Steps to setup Enterprise AP :-
Enterprise APs usually need mounting on ceiling/wall. So their location need to be pre-decided. This is a difficult exercise but it has to be done right.
Positioning APs too far might lead to blind spots. Setting up too many APs in close vicinity will give rise to interference that is very hard to measure upfront. Also, moving these APs later is going to be difficult task.
If you have the floor plan of your setup, you could send it to Ubiquiti folks at support@ubnt.com & they will be able to come back with suggestions in terms of how/where to setup AP.
You could also do exercise of generating WiFi heatmap. Download the software from http://www.netspotapp.com/, upload your floor map & then you need to click 3 points on the map while taking your laptop to the position. It will generate the WiFi heatmap. Even ubiquiti folks might ask you to send them the heatmap.
Once the location is decided, you need to follow the following steps to install the AP.
1. Mount the AP on the wall or ceiling at appropriate place.
2. The AP comes with a poe power injector which is the source of power for the AP. The wire from the router need to terminate on this device & from the other side, another cable will then go to the AP. There is a power plug on this device that you need to plug in to a power source.
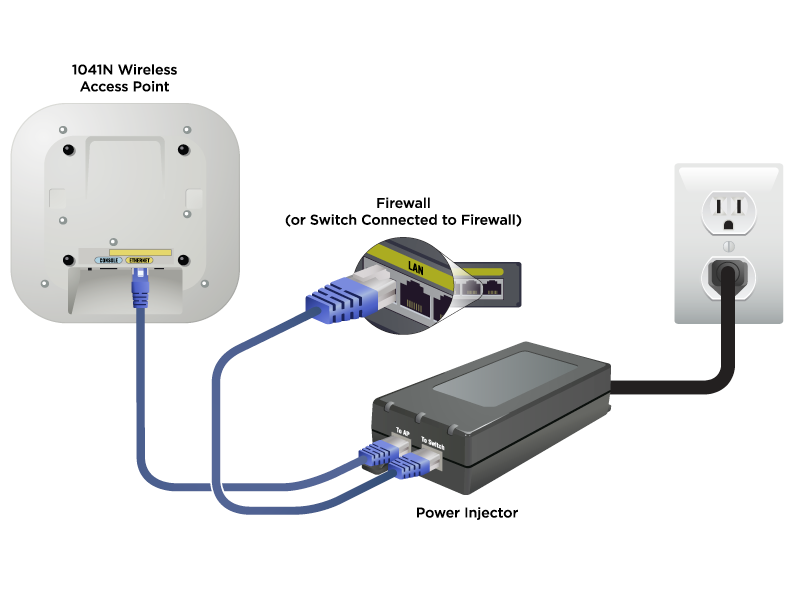
3. Plug the cable from the poe power injector to the AP. Most APs come with single ethernet port. If there are multiple, you need to figure out which one it needs plugging into.
4. These APs come with their own wireless controller from which you could setup the WiFi SSID & password etc. Refer the AP manual for more information.
Steps to convert home router to AP
1. Switch on the router & connect to its WiFi. If it is a new router, its WiFi password is at the back sticker of the router.
2. Login to the router dashboard. The router dashboard usually is at http://192.168.0.1 or http://192.168.1.1 . The login credentials are usually at the back of the sticker. Locate the LAN interface inside Network Settings & give a static IP in the same subnet as that of your main router.
For eg. if your main router’s IP is 192.168.1.1, that means every device connecting to the router will get 192.168.1.x IP. You could give 192.168.1.2 IP to this AP. Give separate/unique IP to each AP.
For Griggi, the IP address of APs need to be in 192.168.7.x subnet. The instructions are under Testing APs under Griggi Setup below.
3. Locate DHCP setting on the dashboard & disable DHCP. Ideally, you want all the traffic to be routed to the main router, hence this step. After this point, if you need to access the AP router dashboard, you need to connect to the any WiFi in the setup & access the IP that you have setup for this AP in step 2.
4. Run an ethernet cable from LAN port of your main router & connect to the LAN port of this newly turned AP.
Testing wired AP setup
To ensure you got the setup right, you could temporarily name the WiFi SSID of the newly created AP different from the main router or other APs. Connect to the WiFi & you should ideally get the same IP on your device as you would get when you had connected directly to the main router or other AP.
If you are unable to get an IP address or not able to connect to WiFi altogether, refer to the troubleshoot section below.
Wireless AP setup (wireless bridge)
This mode is usually discouraged in enterprise AP setup. If you investing into enterprise AP, the assumption is, you are aiming at providing high speed internet & as explained above, hooking up AP to the main router through WiFi is going to throttle internet speed.
Usually this setup is preferred with the cheap home router turned AP, typically because you are interested in extending WiFi without the hassle of wiring & not worrying much about speed. Hence we will only talk about wireless setup for home routers turned APs.
1. Switch on the router that you are going to convert to AP & connect to its WiFi . If it is a newly bought device, the WiFi password is usually at the back sticker of the router. The admin dashboard is usually at either 192.168.0.1 or 192.168.1.1 . The admin username password is also on the back sticker.
2. Same as that of wired AP, locate the LAN IP inside Network settings of this device need to be made pre-defined/static. The IP need to be in the main router subnet. Eg. if the main router IP is 192.168.1.1, you could assign 192.168.1.2 to this AP. Note that all APs need in the network need to have different but static IP.
After this step, the router dashboard will be accessible at this IP.
For Griggi, the IP address of APs need to be in 192.168.7.x subnet. The instructions are under Testing APs under Griggi Setup below.
3. Under Wireless section, look for WDS bridging option. WDS lets you wireless pair this device with the WiFi of any other AP or that of the router. Enable it. There should be an option to survey/scan for available network. Select the WiFi of the main router to pair up. You would need to provide password of the main router WiFi once you select it for extending.
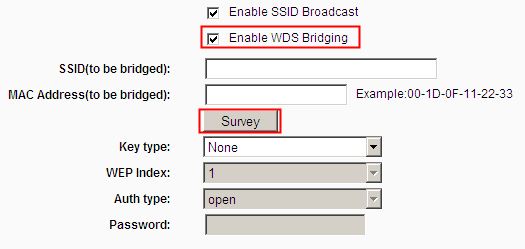
4. Connect to the AP & your internet will still not work. The last step is to disable DHCP on the AP. Access its dashboard & under DHCP setting, disable DHCP. Post disabling, the AP will reboot. Connect to its WiFi again & check if your internet is working.
5. If you intend to change the WiFi name or password (possibly to match that of the main router), do it now.
If you are using a TP Link router, more elaborate instructions are at http://www.tp-link.com/us/faq-440.html
Test wireless bridging
1. Its a little tricky to test wireless bridging as both main router & the AP has the same WiFi name. You can either install the ‘Wifi Analyzer’ android app. Open the app & select ‘channel graph’ to see the graph of all WiFi SSIDs. Your WiFi should show up twice on the graph.
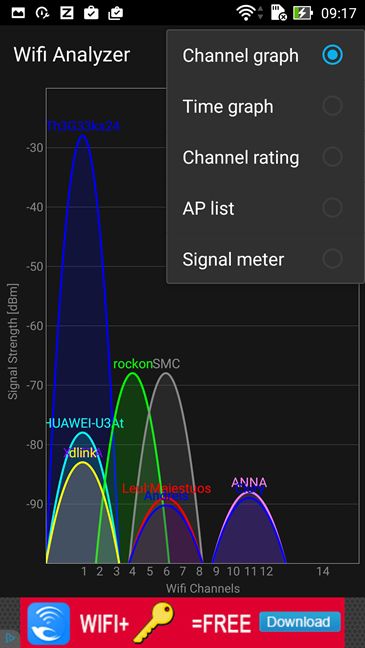
2. The other way you could test is to go to a location where you had earlier not received the WiFi signal from the main router but can potentially get the WiFi from the AP.
Testing APs in Griggi setup
If you have Griggi on your main router, you can follow these additional steps to ensure the AP is setup right.
1. When you connect your phone/laptop with the WiFi of the AP, ensure that IP assigned to the devices are in 192.168.7.x subnet as the main router IP is 192.168.7.1 .
2. If you have had a device already authenticated with Griggi WiFi before, connecting it to the AP WiFi should not bring up the login page.
This is particularly important in the wired AP setup. If you have not disabled DHCP on the AP & plugged the cable to the WAN port of the AP, it is acting as a router & giving its own IP. Also, to Griggi router, its the AP’s mac address that is visible & not the mac address of connecting device. So the data accounting will get broken.
Troubleshooting
There could be following issues :-
1. WiFi stuck at ‘obtaining IP address’
If you try connecting your device to the WiFi & it shows ‘obtaining IP address’ for quite sometime & then drops the WiFi connection off. This problem is because the AP to which you are connecting is unable to get IP address from the main router. Since you have disabled DHCP on the AP, the AP can not give IP address anymore.
1. Check the connectivity from the main router to the AP. Make sure the ethernet cable between router & AP is on the LAN ports on both devices. If you have mistakingly put cable on the WAN port of the AP, switch it to the LAN port.
2. There is a chance that main router is off. Keep a note of this point as this is a common problem in which you are sharing internet across multiple floor offices & you have router positioned somewhere else. Also, during power fluctuation, the main router will take a bit of time to become operational while the AP is usually fast to get started. So there could be a moment when WiFi seem non-functional with the ‘obtaining IP address’ message
2. Device shows ‘Connecting’ under WiFi & then falls off the WiFi & show ‘Saved’ then again tries to connect & fails & the loop continues
This might happen for a few devices that are unable to connect to the WiFi while other devices work fine. Mostly, this is due to the fact that the AP the device is trying to connect to is over its WiFi device support capacity. This would depend on AP’s WiFi hardware.
If you face the issue that some APs located at ‘central’ location get lot more connection request than the ones in the periphery, you could tweak the ‘transmission power’ of the WiFi signal of the central APs. This setting is located in the Wireless section although not all router dashboard will expose this option. Bring down the power of central APs & increase the power of periphery APs. That way, the devices start to connect to periphery APs which will reduce the load on central APs.
Preventing WiFi interference
While it is easy to figure out the WiFi strength/reach by looking at the WiFi bars on your phone/PC at various location in your setup, interference is something that usually go un-noticed. Each WiFi SSID from an AP occupy a band. There are over 11 bands that these signals could use. Now that you have multiple AP setup plus you have WiFi being broadcasted by the nearby establishment router, congestion happens if you are connected to WiFi whose band is being occupied by other WiFi too, including your own APs.
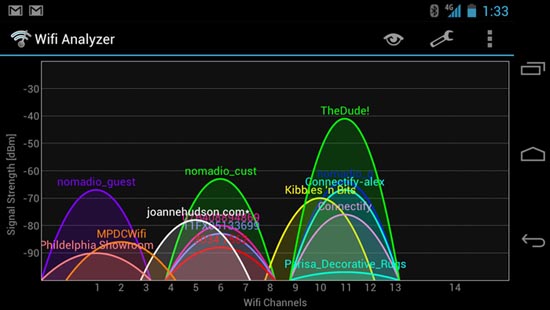
If you are connected to WiFi that has congestion, you tend to experience lower speed than what you could potentially get. Also, there is reasonable fluctuation in the internet speed over WiFi (you can find this by running speedtest in close interval).
Sometimes decent amount of internet fluctation could be because of your main router. This could be because some might be running a long download or doing something bandwidth heavy (like watching youtube video) & there is little bandwidth left for other purposes.
The way to solve this problem is to implement QoS on the router. Checkout Griggi router which does many other things apart from QoS.
Although there are 11 bands on which you could potentially put your AP SSID on, the standard bands are 1, 6 & 9. Putting bands outside this run a risk of a user device not being able to work properly with WiFi. While most modern OS could connect to any band WiFi, the problem would arise for people using old devices or old OS on their device.
The best way to avoid interference from your own network is to put them on different bands, such that, if a user is at location X & connect to an AP, the other AP WiFi signal he is getting are on different bands so not to create interference.
This is kind of an open ended formula. To implement this, ideally, you should setup your APs such that, a (major) location in your office setup should not have more than 3 APs WiFi reaching to the place. So you could allocate 1, 6 & 9 band to each of the AP WiFi SSIDs respectively. Now move to other locations & calibrate the band for the other APs accordingly.
Another important thing to note is to not have multiple WiFi SSIDs like guest etc. People usually end up creating multiple SSIDs for guest, dev, QA & various other teams. Primarily the purpose of this is to segregate traffic for groups as they might have different access rights or privileges.
This is the wrong way you are solving the problem. You should create an authentication system on your router & put folks on separate VLAN if the intention is to segregate these people out on the network. Creating separate WiFi & hooking up one VLAN to each SSID is probably an easy, but really bad approach as it is going to create significant interference issues.
Running out of ports in main router ?
If you have done wired setup, you would soon realize that if you are connecting APs to the main router, you could only connect APs as many as LAN port available on your main router.
To connect more APs, you could try one of the setup
1. You can connect a new AP to one of the LAN port of existing AP. You do not need to draw wire from the router all the time.
2. You could get a switch. They cost as less as $5 in the market. You could connect one port of the switch from the LAN port of the router & rest of the ports to one AP each. Switch effectively increases number of ports for you.
You need to note that you can not have wires > 100m in length between router & AP or between 2 APs, as it would lead to heavy signal loss. You should either get an AP or a switch within less than 100m hop to counter this problem.